Find out 5 new tips to improve your Max2Play Setup even more! We put together five brand-new tweaks and hacks to make sure you get the absolute best Max2Play experience, be it as multiroom audio with Raspberry Pi sound cards or with just one Pi Zero Wireless running on its own.
↧
5 New Tips to Improve Your Max2Play
↧
Whity’s PiBoxTouch – Max2Play on TableTop
Great project by Whity, who previously introduced us to his HiFiBerry Streamer. Now he put together another compact streamer. The PiBoxTouch fits all the necessary parts for a touchscreen-based, sound card-intregrated Max2Play Raspberry Pi streamer in one compact metal casing.
↧
↧
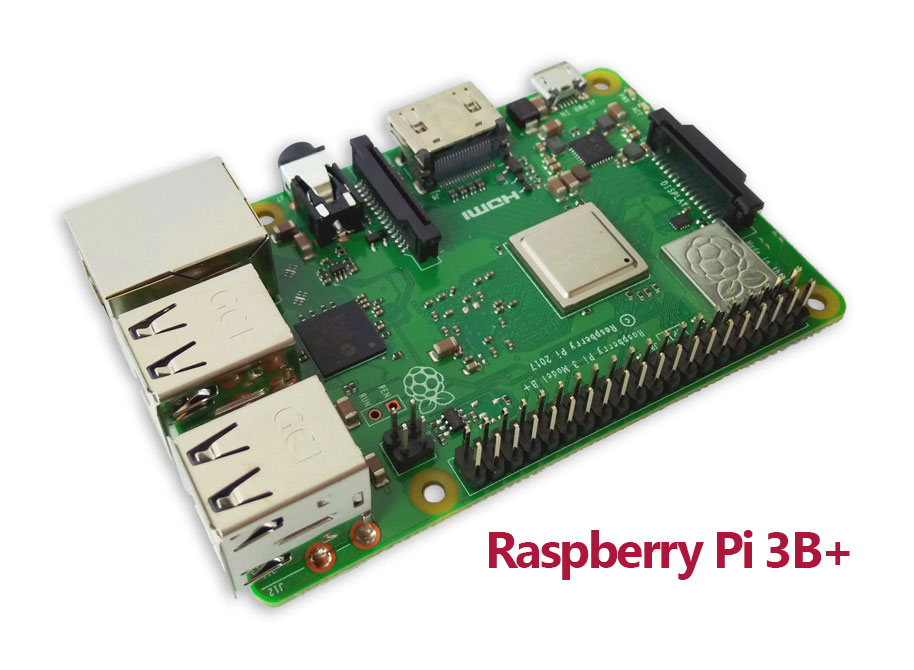
New Raspberry Pi 3B+ for Max2Play
Max2Play offers the new Raspberry Pi 3B+ with all our bundles, now! Here, we gathered some information that helps you decide whether this new version of Raspberry Pi is the right model for you. The 3B+ is an upgraded version of the popular Raspberry Pi 3B model. To find out what has changed and what remained the same, have a look at these technical specifications in comparison with the 3B, as well as the breakdown of changes.
↧
PiJuice – Battery-Powered Max2Play for Mobile Solutions
The PiJuice extension header adds an uninterruptable power supply battery to your Raspberry Pi! This is especially helpful in connection with our standalone features like the Access Point Setup Plugin making it much simpler and more elegant to create mobile, independent projects with your Raspberry Pi.
↧
3 Squeezebox Server Plugins for Your Max2Play
3 Squeezebox Server Plugins to get the most out of your Max2Play Multroom System, includes integration of smart speakers, group players and music and artist info.
↧
↧
New Sound Card DigiOne Signature and Cases for Allo Products Out Now!
We introduce our newest sound card, Allo's DigiOne Signature, as well as the Max2Play bundle and some new cases for MiniBOSS and DigiOne!
↧
Accessories in the Max2Play Shop
An overview of all Max2Play accessories, from HiFi audio cables to control elements like rotary encoders and infrared to adapters for wireless connectivity. All these items are optimally supported by Max2Play and can be purchased in our shop.
↧
Clear Sound with the Audiophile iPower by iFi Audio
The iPower by iFi Audio is the audiophile power supply for Raspberry Pi sound systems. Its Active Noise Cancellation+ (ANC) cancels all incoming noise.
↧
New IQaudIO Sound Cards: Pi-DAC+, Pi-DigiAmp+ and Pi-DAC+ Pro
New and optimised versions of IQaudIO's HAT sound cards are now available at Max2Play! Now with 40-Pin GPIO header and pre-programmed EEPRO-Memory (EEPROM).
↧
↧
New Sound Card Manufacturer – MamboBerry HD DAC+ by Collybia
Collybia's new Mamboberry HD DAC+ sound cards with Femto Clocks by IDT or Crystek now available in our shop and supported by Max2Play. Collybia Mamboberry HD DAC+ sound card with Femto Clock, NICHICON and WIMA capacitors, ELNA bypass filter, SUSUMU SMD-resistors and SABRE 9023p.
↧
HiFiBerry Holiday Box
The Max2Play HiFiBerry Holiday Box includes all the components for an audio tinkerer's project and is the perfect gift for the holidays. It includes the exclusive Max2Play DIY Guide.
↧
Overview of Raspberry Pi Sound Card Specs
In our sound card comparison, different terms regarding the performance features and built-in components of our sound cards appear which may not be familiar to everyone. That’s why we have categorized these terms and collected them in three easy-to-read tables. For each one you can find short descriptions in the tables which simply explain their essential characteristics. If you have any questions or feedback, feel free to leave a comment below.
Core Components |
||
| Sound Chip | integrated circuit for sound output on computers | The heart of the sound card with D/A converter and interfaces to the rest of the system. The sound chip enables the sound output and directly affects the sound quality. It specifies sound parameters such as maximum sampling rate and bit depth. If necessary, values such as filters and the dynamic range can be adjusted. |
| Clock | ensures correct timing during operation | Submits pulses at a specific frequency. Consists mostly of an oscillator with quartz crystal, from whose frequency higher and lower frequencies are generated by synthesis. Thus, a constant output signal in frequency and amplitude is ensured. |
 |
| Headphone amplifier | affects volume when using headphones | Additional amplifier for operating headphones, which directly affects the maximum volume. |
| GPIO | group of multiple pooled contacts, slot for HAT sound card | General contact pins on an integrated circuit whose behavior can be determined by programming. |
Other Components |
||
| Filter capacitors | absorbs voltage peaks, ensures an even current flow | Low AC impedance capacitors for diverting high frequency noise. Attenuate transient voltage pulses, caused by (e.g.) switching operations. |
| Film capacitors | Block voltage spikes and high (spurious) pulses in the higher frequency range | Due to the lower series resistance they have excellent pulse and current carrying capacity and a very high insulation resistance. |
 |
| Audio filter | filter certain frequencies | Audio filters can amplify, transmit or attenuate some frequency ranges. |
| EEPROM | for storing smaller amounts of data, usually preset by the manufacturer | A nonvolatile electronic memory device that stores data in which the information must be preserved even without applied supply voltage. |
| Inductor | protects the board from destructive voltage spikes and high inrush currents | A passive two-terminal electrical component that stores energy in a magnetic field when electrical current flows through it. |
 |
| Switch Mode Transformer (DC-DC Transformer) | converts the voltage level of a DC power source into another (after converting it to high frequency AC power) | Used for galvanic isolation when operating a switching power supply to an AC line. Improves the voltage balance between transmitter and receiver circuits. |
| DC-DC Converter | converts the voltage level of one DC source into another | Electrical circuit that converts a DC voltage supplied to the input into a DC voltage with a higher, lower or inverted voltage level. |
| Jitterbuffer | minimizes the clock skew | Signal is held in a buffer to ensure trouble-free operation if the original signal is affected by jitter. (e.g. NB3L553 in Allo BOSS DAC) |
Interfaces, Parameters and Software |
||
| Sampling rate | Frequency of converting an analog to digital signal | Frequency with which an analogue signal (time-continuous) is sampled (measured) in a given time and converted into a time-discrete signal. Unit: Hertz |
| Bit depth | determines the dynamic range of the signal | Number of bits used in quantizing the analog signal per sample. Unit: Bit |

Sampling of a time-continuous signal: |
| Output Power | Power sent to the speakers in watts. | Power that is delivered at the output terminals of a power source continuously or as a time-limited overload. The output power of the amplifier determines among other things the achievable volume. (Amp related value) |
| Signal-to-noise ratio (SNR) | Evaluation score assessing the quality of the audio signal | Measure for the technical quality of the wanted signal, which is overlaid by a noise signal. Ratio of the mean power of the wanted signal to the mean noise power of the interfering signal. Unit: Bel |
| I2S | Interface for the transmission of digital audio data | Interface for communication between integrated circuits with serial digital audio data. |
| ALSA (Advanced Linux Sound Architecture) | standard sound architecture for Linux systems | Basic component of the sound system under Linux. Provides the core modules that can be used to address the sound adapter. |
↧
Step-by-Step Multiroom Audio Setup with Max2Play
Multiroom Audio – the link between smart home and hi-fi audio – is gradually finding its way into our households: Several players are controlled by a central control unit (usually an app), so that the whole apartment can be filled with your favorite music – optionally even synchronized. Often in this field, several smart (internet-enabled) speakers such as Sonos, Bose SoundTouch or Teufel Raumfeld are connected to each other via manufacturer software. These systems can then be expanded as desired with more of the manufacturer’s speakers. This usually works well, but isn’t really affordable for me. However, such setups cost several hundreds to thousands of Euros. In addition, the supported services and features of these speakers are usually limited and can only be used ideally with the manufacturer’s own products.
But most of us still have one or two „offline“ speakers at home. Wouldn’t it make more sense to make those speakers smart and multiroom-capable instead of buying new expensive speakers?
With the help of Raspberry Pis and suitable sound cards, this can actually be done easily and inexpensively. Both components are simply stacked together, connected to the loudspeakers with common audio cables and set up via the Max2Play web interface.
In this series of articles, I’ll show you step by step how to assemble and set up such a system.
A little bit about myself:
I’m a student from Leipzig and worked at Max2Play in the internship semester of my bachelors degree in media technology. I’m more or less tech-savvy, which in my case means that I know how to search the internet for solutions to technical problems and apply them if necessary. I wouldn’t call myself an expert in audio nor technology. Although I value a good and balanced sound, I can listen to music on the go with old in-ear headphones if necessary. In conclusion, I am a music lover with moderate technical knowledge and a low budget.
Luckily, it does not take any special skills to set up a Raspberry Pi with a sound card and Max2Play. On the contrary, anyone can build such a multiroom setup and I’m willing to prove that with the upcoming articles.

Why Multiroom Audio?
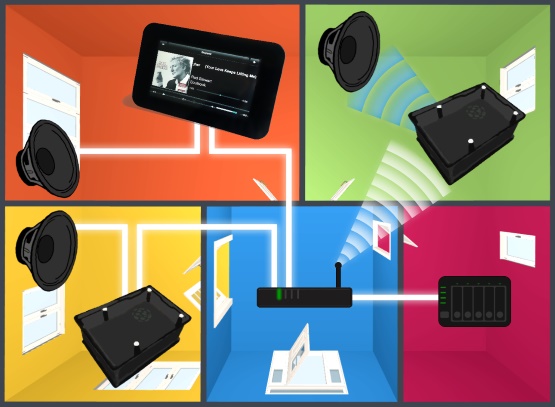
It is just great to listen to your favorite music in the whole apartment or even the whole house. The best part is when you can synchronize the players (the devices that play the music). You can continue hearing the music that is currently playing in the living room, when entering the kitchen or any other rooms.
An important point is also the central control of these players through a media server. Max2Play uses a so-called Squeezebox Server here. It is installed on one of the devices and distributes the music to all other connected audio components in the house. You can easily operate this server with an app, the web interface or another control device.
Three Easy Steps to Multiroom
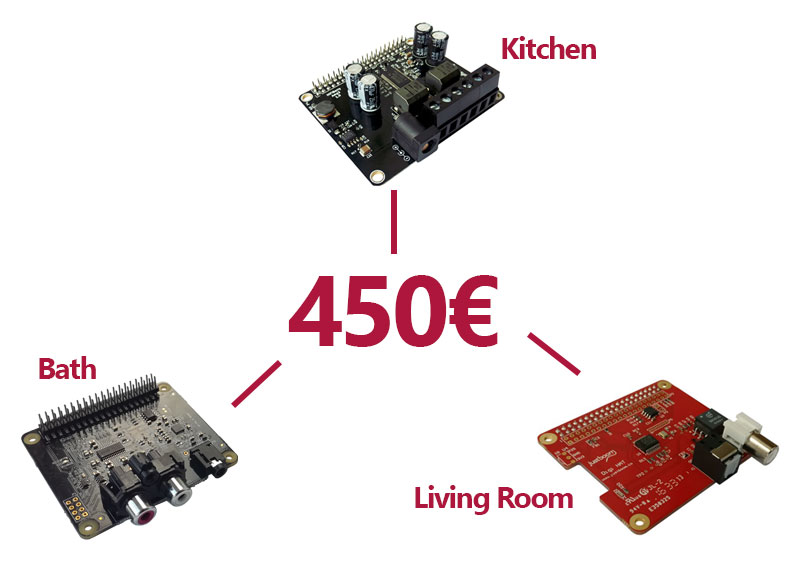
In the next articles of this series, I’ll show you how to outfit every room in your home with a Max2Play Hardware Bundle and how to install and set up the software. In doing so, I’ll explain every step precisely while avoiding any technical language. In the first article we start with the living room and a Digi-Bundle. (Digi Bundle? Don’t worry, I explain the term below.)
For all three bundles (3 rooms) I have determined a total budget of 450 €. In this price range, there are no other Multiroom systems with comparable quality and flexibility.
Depending on how many rooms you want to equip and which audio components you want to integrate, you may not need some of the three types of sound cards. However, I don’t just write about the hardware setup, but also explain how to install and set up useful software on your Max2Play devices. It is worthwhile to stay tuned in any case.
Basic Information to Get Started:
What is a Raspberry Pi?
A Raspberry Pi is a mini computer in credit card format. The board has everything a computer needs: HDMI output for a screen, jack output for headphones, USB ports for using mouse and keyboard, Bluetooth, a WiFi and ethernet. The operating system of the Pis is usually Linux-based and freely configurable. The Pi can thus be reprogrammed and adapted to your own needs. This makes it the perfect solution for any application.
What types of sound cards are there and how are they different?
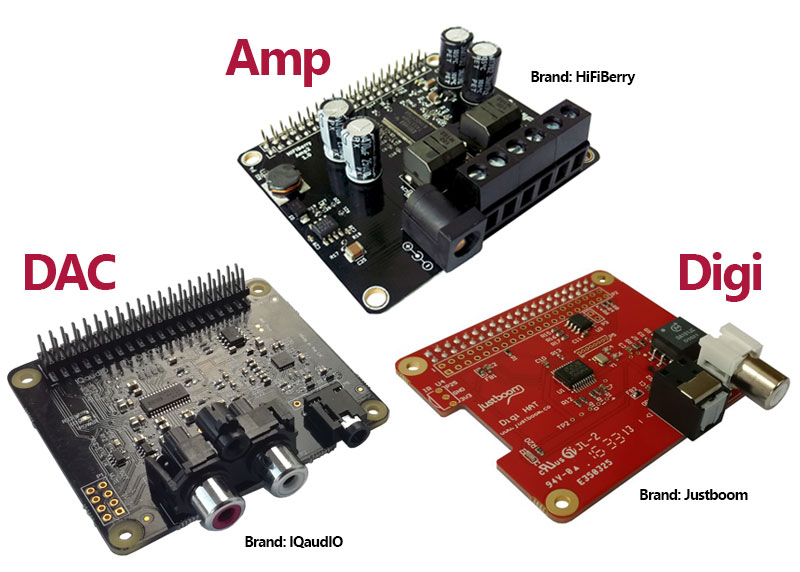
There are three main types of Raspberry Pi sound cards: DACs (Digital-Analogue-Converter), Amps (Amplifier) and Digis (Digital-Transporter). Each type has different audio outputs because they are intended for different fields of use.
A DAC sound card usually has two RCA (cinch) outputs (L and R). The name comes from the fact that it converts the digital data stream (i.e. the music) for transmission into an analog signal. For connection, active speakers (or other components with analog input), which already have an integrated amplifier, are required.
An Amp sound card usually has 2 to 4 screw terminals for connecting passive speakers. In contrast to active speakers these speakers need amplification with the help of a larger power supply. This power supply then provides power to the amp sound card, the Raspberry Pi and the passive speakers concurrently.
A Digi sound card is used to forward the digital data stream to a digital input (HDMI/optical/coaxial). The digital-to-analog converter must therefore be present in the target device. A digital transporter sound card has to ensure bit-precise transmission.
Why do I Need a Sound Card?
To listen to music with Max2Play and the Raspberry Pi, you do not necessarily need a sound card as the Raspberry Pi has both a jack (analog transmission) and an HDMI output (digital transmission). However, the quality and performance of the analog signal of the jack is not optimal. For a better sound experience, it is recommended to use a sound card that handles audio processing and transfer only. In addition, most sound systems require specific connectors such as RCA (cinch) or TOSlink.
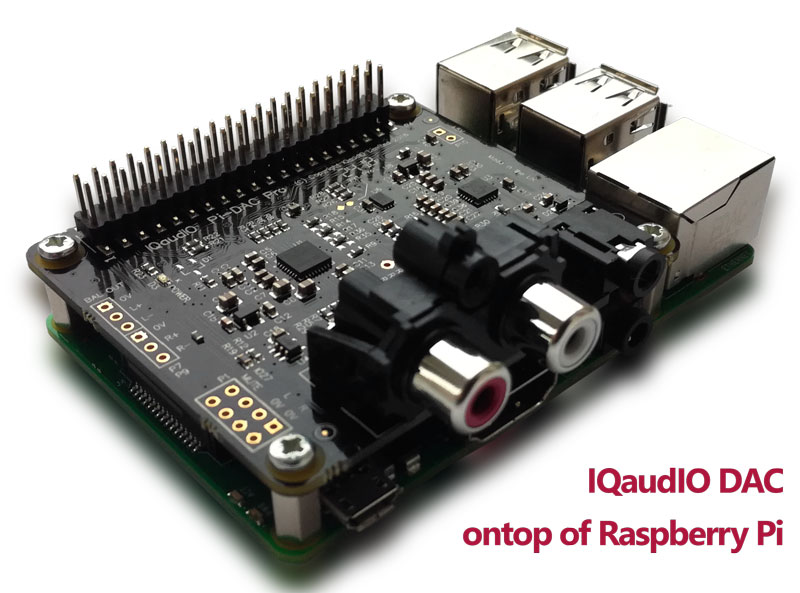
How do I use Pi and Sound Card?
You can simply stack the sound card ontop of the Raspberry Pi. Then just connect them to the power supply and speakers and your setup is fit for use.
Max2Play's Advantages:
Besides the Squeezebox Multiroom software, Max2Play also offers many plugins that you can use to expand your system, e.g. Spotify Connect, Bluetooth integration and home automation plugins. The extensions can be installed and set up with just a few clicks and then provide you with new useful functions. An overview of all Max2Play plugins is available here.
| Advantages of Max2Play | Features |
|
|
↧
↧
Step-by-Step Multiroom Audio Setup with Max2Play – The Living Room
As I’ve laid out in the first article, we now dedicate ourselves to one of the hardware bundles of Max2Play which we want to integrate into our multiroom setup. In this case, the living room is equipped with a Raspberry Pi and a Digi sound card. Here you will learn how to build this bundle and connect it to your audio devices and the TV. I’ll also show you how to set up the Max2Play software and play music and movies with the Kodi media player.
Living Room
Most people have a TV in the living room, as well as a connected sound system with speakers. Most modern soundbars and AV receivers have a digital input – be it an optical („TOSlink“) or a coaxial input. Therefore, the use of a digital transporter sound card in the living room makes the most sense for the majority of homes.
I opted for the Justboom Digi HAT sound card, because it is especially suited for control via infrared remote, which always lies around in any corner of the living room. The IR receiver is also included in the order when purchasing via the Max2Play Shop (however, it must be soldered on manually). With a transporter sound card, the quality of the audio playback is dependent on the Hi-Fi end devices, e.g. your AV receiver – making sure your stereo gets the best unaltered signal possible. The bundle with sound card and Raspberry Pi is available at the Max2Play Shop from 114.99€.
To find out which sound card suits your setup best, you may consult the Max2Play Multiroom Audio Configurator or the Sound Card Comparison Charts for further information.
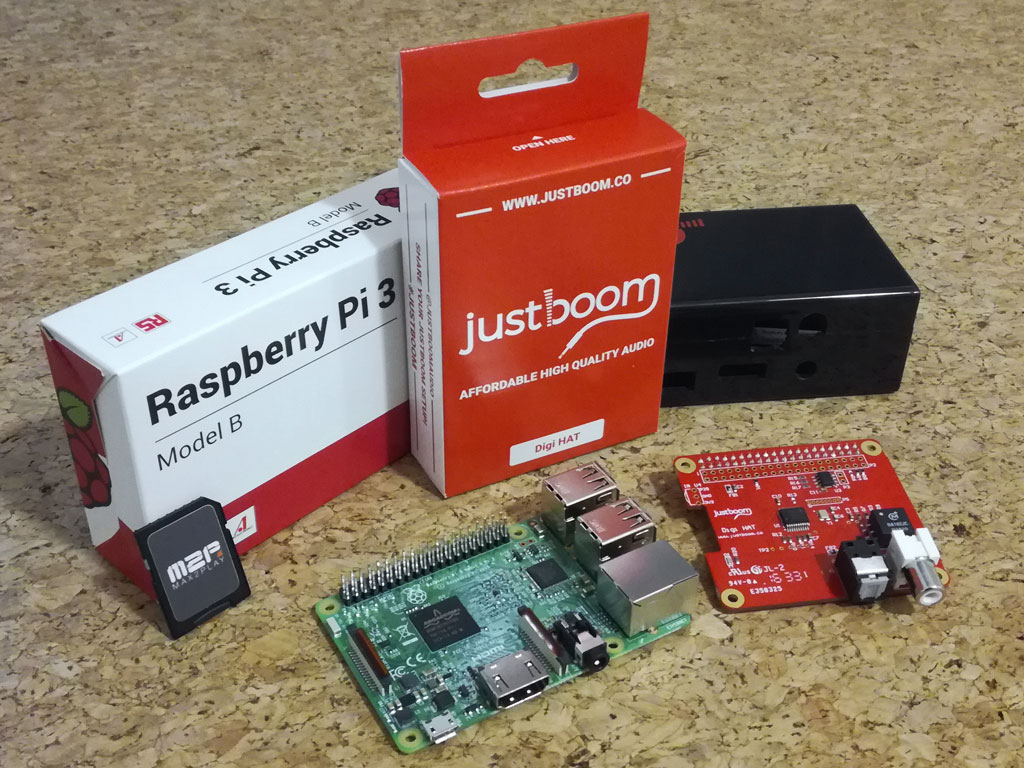
The bundle contains the following parts: Note:If you want to control your sound card via IR remote, you can read here how to install and set up an IR receiver on the board. First you have to guide the 4 plastic spacers through the 4 holes on each side of the Pi and fix them with the nuts from the other side, as seen in this pictured. Now you can put the sound card ontop of the Raspberry Pi. That’s what the so-called GPIO pins are intended for. These are 20 small pin pairs that provide for the transfer of data between sound card and Pi. You have to hold Pi and sound card as I pictured here and gently push the card down until it sits firmly on the spacers. After that, the remaining screws have to be screwed from above through the holes of the sound card into the spacers. Now insert the Max2Play SD card into the corresponding slot. If you have not purchased an SD card with a pre-installed Max2Play image, you can read in our Wiki how to burn the image yourself to an SD card. Remove the protective foil from all housing parts and put the rubber feet through the 4 holes of the bottom plate. Now take the Raspberry Pi and sound card and put the left side of the housing on it. The recesses of the side plate should fit exactly to the connections of the Pi. Then do the same with the right panel. Now you can push them from above into the recesses of the bottom plate. You’ll find that the headphone jacks on the Pi and sound card prevent the parts from being pushed together. Gently pull apart the sides of the base plate a bit. Do not use any force, so that the housing or the connections of the Pi or the sound card are not damaged. Finally you can put on the ceiling plate. Again, you may need to press the sidewalls of the bottom plate a little bit apart. Your Max2Play device is ready! All that’s left to do is connecting it to the TV and the AV receiver (or a soundbar, for example). To connect the Pi to the internet, I recommend you use a LAN cable. You can also integrate it into the home network via WiFi. Use the WPS function of your router or the Raspberry Pi’s automatic access point feature for that. After booting up and an unsuccessful WPS search, the Pi automatically switches to Access-Point-mode thanks to Max2Play, so you can easily find your device in the Wi-Fi search on your smartphone (or other WiFi device). The password is „mypasscode“ by default. If the connection is successful, you can make the necessary settings in the web interface to connect your device to the internet. Depending on the sound card, the Raspberry Pi is powered by its own micro USB port with a 5V power supply or via the sound card. In our case, both Raspberry Pi and sound card are powered by the power supply connected to the Pi. Plug in the power adapter and the device starts up. If you have connected your Pi to the network with a LAN cable or activated WPS on your router while booting the Pi, your device is now accessible in the home network. The Max2Play web interface can be easily accessed in the browser of your PC or smartphone. Enter „max2play/“ in the searchbar for that. (If that does not work right away, you can also enter the IP address of your Max2Play device, which you can find in the web interface of your router.) When you visit the web interface of your Max2Play device for the first time, you can select the manufacturer of your connected sound card. In our case, that’s JustBoom. Afterwards a corresponding plugin for the sound card is loaded, after which you must select the sound card model. This is necessary to load the correct driver for your sound card. Click on Save and on the link in the now appearing yellow message to restart the device. Then select „Advanced“ to set everything up for the multiroom functionality. After that, a new restart is necessary. Now click on the tab „Settings/Reboot“ and change the name of your device. This will also be the Player-name, e.g. „Living room“. Then restart the device again. Now you should activate your license to use all the premium features of Max2Play. Use either your e-mail address in the shop or a Max2Play license code (depending on your order). Squeezelite is our primary audio player. It is used to play back the music of the Squeezebox Server and can be controlled by Jivelite (see below for more). It can be started and stopped in the Max2Play web interface. Since we have already selected our sound card and the „advanced“ preset, we do not need to make any additional settings for Squeezelite and it is already in autostart mode. The audio output via the sound card has also been set up automatically. If you want to change the audio output for Squeezelite, you can do so in the advanced settings of the audio player. We are now ready to install a server – the basis for Multiroom Audio – on our device. The Squeezebox Server (or „Logitech Media Server“) is at the heart of Max2Play’s multiroom audio applications. You can use it to play music in multiple rooms at the same time, synchronize and easily control them with a smartphone with the interface of your choice (app or browser). Click on the Squeezebox Server in the Max2Play web interface, select one of the available versions (7.9, 7.9.1 or 7.9 nightly) and Max2Play installs the program after clicking on „Start Squeezebox Server Installation“. Make sure that the „Alternative Packet Source“ line is filled with a link describing your desired version. I recommend you use the current version 7.9.1 (as of 01/2019). Once the installation has been completed, the Squeezebox web interface can be reached by clicking on the large blue button. In the next article, I’ll show you more about the Squeezebox Server and its web interface. At the moment, it is enough to install it because we can already use Jivelite – a visual control interface for the server – on a connected screen. Jivelite is an open-source program with a graphical interface for controlling all audio players in the network. It can be used to visualize and operate audio playback via the HDMI port or a touch screen connected to the Max2Play device. So before you start it, you should connect a screen (like your TV) to the Raspberry Pi and reboot the system. The surface that appears first is the standard Linux desktop.
Jivelite is usually preinstalled on every Max2Play image. To start it, navigate to Jivelite in the web interface and click on „Start Jivelite“. You can also add it to the autostart, hide the taskbar and start Jivelite in full-screen mode. On the desktop you can now see the interface of Jivelite. Here you can first set the resolution and select your language. As a reminder, both Squeezelite and the Squeezebox Server must be running for audio playback. If this is the case, you can select your Max2Play device under „Choose Player“. Now all features of Squeezebox are available to you. Kodi is an open-source media player software that lets you watch videos and photos as well as listen to music. Kodi is distinguished by its smooth interface and great extensibility through plugins. To start it, go to Kodi/XBMC in the web interface and click on „Start Kodi“. First, set the language to your desired one: Click on the gear wheel on the top left, then on interface, language. To feed Kodi with media, we first need to add sources (the places where your media data is stored). Here, for example, you can use a NAS (Network Attached Storage or Network Storage). Of course, the data can also be stored on the Max2Play SD card, an external hard drive (direct connection to Raspberry Pi via USB or through your router’s network storage feature) or your PC’s share, as long as they are accessible on your home network. To change the audio output for Kodi, go to Settings/System/Audio and choose your sound card or HDMI as output device. Before we can add the sources, we should first mount the network path on the Raspberry Pi, so that the folder containing your media appears as a folder in the file system of your Raspberry Pi and you can access it. Then, in Kodi under „Add Sources“ we can select the Pis root file system, find the mounted folder and add it as a source. Another option would be to share the files on the Raspberry Pi or a connected storage drive (stick/external hard drive/SD card) with the home network using a Samba Share. So you can share your files with other devices on the network (which may also run Kodi). After successfully adding one or more sources, Kodi analyzes the files and automatically retrieves metadata such as music/movie titles, album names, or descriptions. Now you can test if your device is set up correctly by simply playing a song or a video with Kodi. More information about Kodi can be found here: Kodi Wiki
 Time for the first step! Here, we’ll take care of setting up and connecting the JustBoom Digi Bundle Hardware.
How to Assemble the Bundle
1. Unpacking
2. Let’s Get Started!
3. Putting the Boards Together
4. The Case
5. Connections
 Now I’ll show you how to reach the web interface of your Max2Play device and make the basic settings.
Basics and Squeezebox Server
1. Turn on Device
2. Opening the Webinterface
3. Squeezelite
4. Squeezebox Server
 In this last section, you’ll learn how to set up and use the Jivelite and Kodi plugins for playback.
Jivelite and Kodi
1. What is Jivelite?
2. Starting Jivelite
3. Music and Movie Library with Kodi
4. Adding Sources


↧
Step-by-Step Multiroom Audio Setup with Max2Play – The Kitchen
Now that the setup of the living room is ready, we are dedicating our attention to equipping the kitchen with a Raspberry Pi and an amplifier sound card. In this article, you will learn how to build such a Max2Play bundle and connect it to your audio devices. I’ll also show you how to set up our Squeezebox Server and use network storage and Bluetooth devices as media sources.
Kitchen
The choice for the kitchen fell on an amplifier sound card for the operation of passive loudspeakers. However, the use of a DAC (digital-to-analog converter) sound card would also be conceivable here. Similarly, an amplifier sound card is also suitable for other rooms – depending on existing hardware and application ideas. In contrast to active speakers (which already have an amplifier built in), passive speakers receive both the audio signal and the power from an external amplifier. They are connected via two cable wires (positive and negative pole), which you have to clamp in the provided connection sockets.
I chose the HiFiBerry AMP2 sound card specifically because it delivers up to 60 watts of output at a good price. The bundle with sound card and Raspberry Pi is available at the Max2Play Shop from 139.99€.
To find out which sound card suits your setup best, you may consult the Max2Play Multiroom Audio Configurator or the Sound Card Comparison Charts for further information.
 Time for the first step! Here, we’ll take care of setting up and connecting the HiFiBerry AMP2 Bundle Hardware.
How to Assemble the Bundle
1. UnpackingThe bundle contains the following parts:
|
|


|
|
2. Let’s Get Started!First you have to guide the 4 plastic spacers through the 4 holes on each side of the AMP2 and fix them with the nuts from the other side, as seen in this pictured. |
3. Putting the Boards TogetherNow you can put the sound card ontop of the Raspberry Pi. That’s what the so-called GPIO pins are intended for. These are 20 small pin pairs that provide for the transfer of data between sound card and Pi. You have to hold Pi and sound card as I pictured here and gently push the card down until the spacers sit firmly on the Pi. After that, the remaining screws have to be screwed from below through the holes of the Pi into the spacers. Now insert the Max2Play SD card into the corresponding slot. If you have not purchased an SD card with a pre-installed Max2Play image, you can read in our Wiki how to burn the image yourself to an SD card. |
|
|


|
4. The CaseFirst glue the rubber feet on the 4 predefined recesses on the underside of the case. Then click both plastic pieces out of the recess for the connections of the amp. Now take the Raspberry Pi and sound card and firstly put the side of the Pi in the case, on which the HDMI-Port is located. The recesses of the case should fit exactly to the connections of the Pi. After that, you can push down the other side, whereupon it should snap into place. Look for the inscription (Insert and Snap) of the case. Now you can start connecting the speaker cables. To do this, screw the cable clamps on the amp with a flat-head screwdriver and insert the cable ends as shown in the picture. Then tighten the clamps again to establish the contact. Now you can put on the case cover. |


5. ConnectionsYour Max2Play device is ready! Before you connect the power supply and start the system up, you need to connect the Pi to the internet. It is best to use a LAN cable for that. But you can also integrate it into the home network via WiFi. Use the WPS function of your router or the Raspberry Pi’s automatic access point feature for that. After booting up and an unsuccessful WPS search, the Pi automatically switches to Access-Point-mode thanks to Max2Play, so you can easily find your device in the Wi-Fi search on your smartphone (or other WiFi device). The password is „mypasscode“ by default. If the connection is successful, you can make the necessary settings in the web interface to connect your device to the internet. |
|


Now I’ll show you how to set up the Squeezebox Server and how to control and synchronize your players.
Squeezebox Server and Multriroom Audio
1. The Ground WorkThe web interface can be reached by running „max2play/“ in the address bar of your browser or by activating the network search under Settings/Reboot in the web interface of the already connected Max2Play device. Perform the initial setup like in the living room. This time, we choose „HiFiBerry“ as the manufacturer and the AMP2 as the sound card, enable the „Advanced“ preset again and rename our player in the Settings/Reboot tab (for example „Kitchen“). To be able to use the Squeezebox Server for Multiroom Audio, it must be running on one of the devices in the network. In our case, we have already installed it on the Raspberry Pi in the living room. If you start with this bundle, you can read in the previous article how to install the server. |
|


|
2. Set Up Squeezebox ServerOpen the Squeezebox web interface on the device where the server is installed. If you are launching the web interface for the first time, you will be asked to login to mysqueezebox.com. Such an account is needed for Squeezebox integration of services like TIDAL and Deezer. If you do not have an account and do not want to create one, you can click „Skip“. Now you can select the sources of your music files to add to your Squeezebox Server’s library. If you do not want to use local files, you can skip this step and the next one (selecting playlist files). Now you see the Squeezebox web interface. At the top right you can choose which player is controlled. In our case the two squeezelite players „living room“ and „kitchen“ should be listed there. By clicking on „Synchronize“ you can now run the same playback over both players at the same time. On the left side of the web interface you can choose among other things, whether you want to hear radio or local music tracks. You can also add other services to this selection, such as Spotify. |


3. Add and Set Up PluginsNow I show you how you can expand your Squeezebox Server with plugins such as Spotify. Go to „Settings“ in the Squeezebox web interface (bottom right) and click on „Plugins“ in the tab that opens. There you will find a list of already active, inactive and third party plugins. Look for the third-party plugin „Spotify for Squeezebox. Still Spotty“ by Michael Herger. Set the checkmark on the left side and click „Apply“ on the bottom right. The plugin will now be activated. After a quick restart of the Squeezebox Server, you can now edit the settings for „Spotty“ in the „Advanced“ tab on the upper left or in the plugin list next to „Michael Herger“. You can sign up with either the one-click authentication with the Spotify app or manually by entering your user data. After logging in, you’ll be able to set the output quality or enable Spotify Connect for the players of your choice. In addition, you will now find the menu item „Spotify“ in the main menu of the Squeezebox web interface. Other interesting plugins for the Squeezebox server are e.g. „Group Players“ and the Bridge plugins which greatly facilitates the Squeezebox integration of smart devices. |
|


|
4. Control with an AppThe Google Play Store, the Apple App Store and even the Windows Store offer a variety of apps that make controlling the Squeezebox Server easier. There are also iPeng (iOS) or OrangeSqueeze (Android), which are not free but have an improved interface and more control options. The apps usually connect automatically to the server in the network. If not, it can be easily added by specifying the IP address and the corresponding port (usually port 9000). In this regard, especially in the kitchen, the control through an app on a tablet makes sense. Several vendors, including iPeng and SqueezePad have already optimized their apps for tablet control. So if you have a tablet lying around, you can use it for ideal control of this setup, and, for example, install it firmly in the kitchen with a suitable holder. If your budget is bigger than mine, Max2Play also offers complete solutions that include a touch screen for the Raspberry Pi. To stream music from your phone directly to the Squeezebox Server, there are Squeezebox plugins like „Shairtunes2“, with which you make the server compatible to Apple Airplay-enabled devices and „UPnP/DLNA Media Interface“ for transmission with UPnP or DLNA. You can follow the same first step from the Spotify plugin to activate those as well. |


In this last section, you’ll learn how to add network storage as a media source and how to set up Bluetooth for Max2Play.
Music Sources and Bluetooth
1. Adding Music SourcesThere are many ways to add music to our Max2Play device. The simplest method is to directly connect a USB stick or an external hard drive to the Pi: In the „File System Mount“ tab of the Max2Play web interface, all connected USB storage devices are listed under „External drives to Max2Play“. In order to be able to play the music on our USB stick, we now just have to copy the specified file path (for example /media/usb0) and declare it as a source in the playback system of our choice. In the Squeezebox Server, this is done in the basic settings under „Media folder“. Other possible music sources include Internet streams (Radio, Spotify, etc.), network storages and transfers from Bluetooth, Airplay, DLNA, or UPnP-enabled devices. |
|


|
|
|
2. What is a network storage?As the name implies, a network storage (or Network Attached Storage) is a storage system that is accessible throughout the network. It must of course be connected to the network and be able to communicate with other devices (mastering transmission protocols). The advantages of such a network memory include the low energy consumption, the simple file access as well as the data security and transmission speeds. The tasks of such a system could be e.g. automatically back up your personal data or use it as a media library to store your photos, music and videos in one place and retrieve them anywhere in your home network. In order to access your data with Max2Play, all you have to do is specify the network path, that means the „directions“ to the folder and your login for the network storage. For this purpose, there is the preinstalled „File System Mount“ plugin. |


3. Adding a network adressTo add the network address of your media folder Max2Play, go to the tab „File System Mount“. We now want to add a new mountpoint. In the first field, we enter two slashes, followed by the IP address or hostname (for example, „MyNAS“) of our network storage. Add another slash behind it followed by the file path to the desired folder (for example …/root/home/media). The IP address of your network storage can be found in the web interface of your router. Otherwise, you can also have your network devices displayed by clicking on the blue button on the right. In the second field, we now write the file path to the folder in the Max2Play file system, which is then linked to the folder of the network storage (for example, /mnt/share). Please use only folders in the directory /mnt or /media within Max2Play. Depending on which file system protocol your network storage supports (usually nfs for Linux and cifs for Windows systems), you must now enter the corresponding protocol in the third field. In the last field you enter your user ID, that means the name and password of your login to the network storage that’s requested. Best copy the given line under the field and paste it. Then replace „name“ with your username and „pass“ with your password for the share. In any case, do not forget „sec=ntlm“ and, if you’ve used cifs before, „vers=1.0“ (depending on the version of SMB your NAS supports) in the last field! If you have problems finding the right parameters for your share, use the Help button. If everything has been entered correctly, you can click on „Save“. Now the folder of your network storage is accessible via the selected folder in the Raspberry Pi file system. |
|


|
4. Installing BluetoothThe Bluetooth plugin is preinstalled with every Max2Play image. You can install the Bluetooth function by clicking on the corresponding button on the plugin page. The installation will take a few minutes. When you successfully installed it, you can turn on your bluetooth device, be it a speaker or a smartphone. Make sure it is visible to nearby devices and start scanning in Max2Play. After a successful search, you can pair your device by clicking on „Connect“. (You may still need to confirm the connection on your smartphone.) |


5. Using BluetoothEither you are using a bluetooth device as audio output or as input: Using a Bluetooth speaker as an audio output: In order to use your Bluetooth device as an audio output you have to declare it as an output for each service. In Squeezelite you can find this option in the advanced settings. In Kodi you can set the audio output under Settings/System/Audio. Using a Bluetooth device as an audio source: When using a smartphone or tablet as a Bluetooth audio input device for your Max2Play devices, there are two options: Either you stream directly to the sound card and use Bluetooth as an alternative player to Squeezelite or you stream to the Squeezebox Server. Both can be installed or started on the Bluetooth plugin page. With most modern bluetooth devices, the stream to the Squeezebox server (which must run on the same Max2Play device on which the Bluetooth feature is activated) will be prioritized over other streams as soon as playback starts on the smartphone. In the Squeezebox Server web interface you will find it under „Favorites“. |
|


↧
Step-by-Step Multiroom Audio Setup with Max2Play – The Bedroom

Now that we have finished our setup in the kitchen, it’s time to focus on the last zone of our multiroom system with Raspberry Pi and DAC sound card in the bedroom. You will learn how to assemble such a Max2Play bundle and connect it to your audio devices. Furthermore, I will show you some more tips how you can control your Max2Play devices with so-called APIs and how to integrate them in home automation with the OpenHAB Server.
Schlafzimmer
The choice for the bedroom fell on a DAC sound card to use active speakers directly with the Pi. An amplifier setup would have been possible here, too. As opposed to passive speakers, the active ones already have an integrated amplifier. They are connected via cinch (RCA) or audio jack cables.
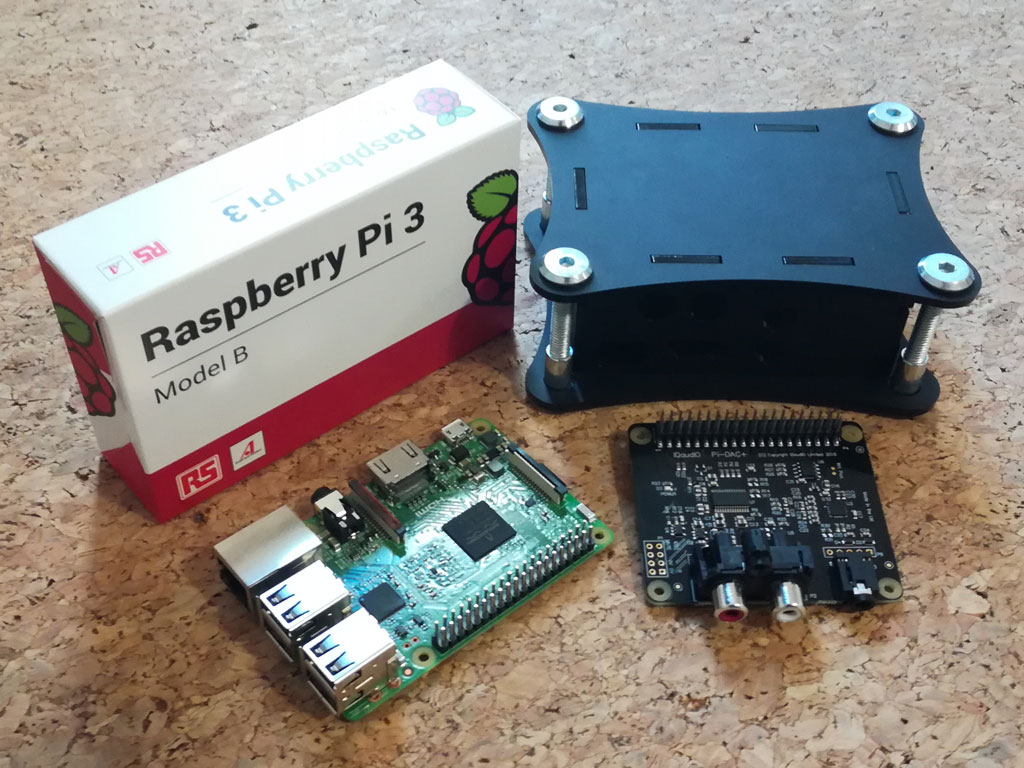
My sound card choice for this zone was the NEW IQaudIO Pi-DAC+ sound card since it is a good sound card for a great value. With Max2Play’s bundle deal you can get all necessary components starting at 119,99€.
To find out which sound card suits your setup best, you may consult the Max2Play Multiroom Audio Configurator or the Sound Card Comparison Charts for further information.
 Time for the first step! Here, we will assemble the IQaudIO Pi-DAC+ Bundle and connect it to our active speaker pair.
How to Assemble the Bundle
1. UnpackingThe bundle contains the following parts:
|
|


2. Lets Get Started!First you have to guide the 4 small metal screws through the corresponding holes on the Raspberry from below and fix them with the metal spacers from the other side, as seen in this picture. |
3. Putting the Boards TogetherNow you can put the sound card ontop of the Raspberry Pi. That’s what the so-called GPIO pins are intended for. These are 20 small pin pairs that provide for the transfer of data between sound card and Pi. You have to hold Pi and sound card as I pictured here and gently push the card down until the spacers sit firmly on the Pi. After that, the remaining screws have to be screwed from below through the holes of the Pi into the spacers. Now insert the Max2Play SD card into the corresponding slot. If you have not purchased an SD card with a pre-installed Max2Play image, you can read in our Wiki how to burn the image yourself to an SD card. |


|
|
4. The CaseRemove the safety film from all panels. Put the Pi on top of the bottom panel and secure it with the remaining 4 screws. To add the side panels, you might have to loosen the screws a little. Adhere to the corresponding holes on the bottom panel and the Pi’s ports. When all side panels are assembled, you can add the top panel onto them. Now you can secure the whole system by fastening the four large metal spacers on each corner of the case. |


5. ConnectionsYour Max2Play device is ready! Before you connect the power supply and start the system up, you need to connect the Pi to the internet. It is best to use a LAN cable for that. But you can also integrate it into the home network via WiFi. Use the WPS function of your router or the Raspberry Pi’s automatic access point feature for that. After booting up and an unsuccessful WPS search, the Pi automatically switches to Access-Point-mode thanks to Max2Play, so you can easily find your device in the Wi-Fi search on your smartphone (or other WiFi device). The password is „mypasscode“ by default. If the connection is successful, you can make the necessary settings in the web interface to connect your device to the internet. |
|


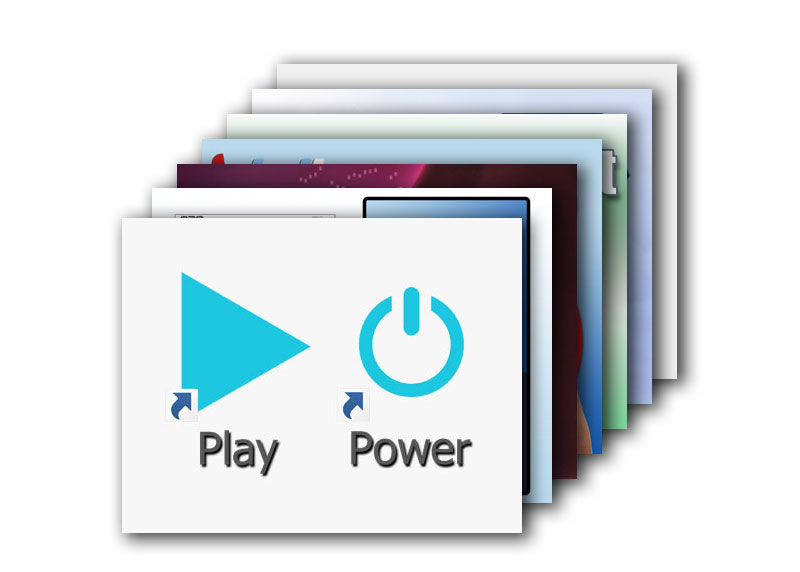
Now I’ll show you how to create shortcuts with API for basic commands of the Squeezebox Server.
API-Examples
1. The Ground WorkYou can access the web interface by entering „max2play/“ in the URL bar of your browser or by using the network lookup feature on another Max2Play device in the Settings/Reboot menu. Make the first steps as you did in the previous articles. This time, you need to choose „IQaudIO“ from the list of manufacturers and select the Pi-DAC+ as your sound card. Activated the „Advanced“ selection as a preset for multiroom rename our player the Settings/Reboot tab under “Playername” (e.g. „bedroom“). Voila, the setup is ready to use as another zone in your multiroom system. You can sync and play individually as you like from your preferred control device (App, Jivelite, DLNA, etc.) |
2. APis – What are they and how to use themAn API is, simply put, an interface for communication between different components, like your Max2Play device, a home automation software like OpenHAB and in this case your smartphone. For example: An app on your phone communicates with the home automation software, letting it know that it just connected to your home network WiFi. As a response you can let it send a play-command to your Max2Play device to start playing music as soon as you enter the home network – fully automatic and without your input. To set up such an if-then scenario, you can use our API-Examples plugin. It offers a list of simple HTTP commands that you can use to control your player from the interface of your choice. Just copy them to be embedded in the systems you would like to use. |

3. Add API-Examples PluginThe Plugin is already preinstalled with the newest Max2Play Image and you just have to activate it from the list of Inactive Plugins in the Settings/Reboot menu. In the API-Examples menu itself, you can choose between the four tabs Squeezebox Control, Jivelite, Kodi, Max2Play. We will use the Squeezebox for this example. The corresponding tab displays the IP of the Squeezebox Server that is currently running. Below that you can now select your player zone of choice in a drowdown menu. The URLs for the player will dynamically change according to your selection. Now you can just copy the URL for the command to your clipboard and add them as a shortcut to applications or an existing home automation system’s interface. |
|


|
|
4. Use APIsBefore you integrate these commands you can first check their functionality in your browser. Just copy the Play command and paste it in the ULR bar of your browser. If you enter it, the playback of the corresponding player should automatically start and small control interface of the Squeezebox Server should open up. |


In this section, I will explain how you can use APIs with a corresponding software.
Home automation
1. Functionality of Home AutomationHome automation systems are intended to make your life easier. You connect different smart devices with each other and control them centrally on a smartphone or tablet in most cases. A lot of the communication can also be automated, for example you could time-start the heating in the morning and the lighting in the evening, have your coffee machine start brewing at a set time or have music start playing when you enter your home. These applications of home automation all require respective hardware and software infrastructures to work properly However, even with smaller apps and servers, you can start creating some useful home automation routines to get started with the subject. |

2. Tasker AppTasker is an app that can execute certain actions when a given set of requirements are met. Such simple if-then relationships that Tasker excels at are for example ‘display pop-up message when it’s my birthday’ or ‘send an HTTP request to my home automation system when I enter the local network.‘ You can then add more than one requirement to your task, to specify your automation further. You could even add a task for when you leave the local network to specify what happens when your requirement is no longer met. The creation of an if-then relation in Tasker is very intuitive. A simple instance of this is pictured here: Once the requirement that the smartphone is connected to your WiFi is met, the task „START playback“ is executed and the corresponding http request (=action) is sent to the Squeezebox Server. |

3. OpenHAB Server BasicsOpenHAB is an open-source home automation platform that can be used as the central element in a smart home. To use OpenHAB with Max2Play, you can install the OpenHAB Server Plugin. For more details you can head to our Wiki article on the plugin. After the successful one-click installation, you can enter the OpenHAB web interface by clicking the big blue button. You can select the standard installation to get started. Use the Paper UI to make your configurations. E.g. click on Add-ons, Bindings and install the Network Binding. This will let you add devices to your network. Head to the Inbox, click on the „+“-symbol, select the previously installed Network Binding and search for your network devices, for example your smartphone. If you cannot find it in the list, you can look up the IP address that’s given to your smartphone in your router’s web interface and add this IP address manually to your OpenHAB binding. |
|


|
|
4. OpenHAB and Squeezebox ServerOpenHAB can also communicate with your Squeezebox Server and its respective players. You can simply install the special Squeezebox Binding (same procedure as with the Network Binding) and subsequently search for the server or add it manually. The IP address of the server is the same as the Max2Play device it is installed on. Afterwards, you can do the same with Squeezelite. You might have to also connect Squeezelite manually with a so-called bridge to your server. To do this, head to the settings of Squeezelite in your OpenHAB web interface (Configuration/Things/Squeezelite/) and select the right bridge. At Configuration/Things, you can now activate respective channels for each entity (e.g. Smartphone, Squeezebox Server, Squeezelite). After activating the channels, you can already control the Squeezebox playback in your OpenHAB Control Panel. In this HowTo you can learn more about OpenHAB and follow in detail how to automatically start playback when connecting your smartphone to your home WiFi. |


↧
Abacus AroioDAC made in Germany
The new AroioDAC from Abacus made in Germany with two separate master clocks, high-precision voltage regulators and 4-way multi-layer design is now available.
↧
↧
Antique Radio in New Splendor with Max2Play and HiFiBerry
Do-it-yourself restoration of a dusty, pitted antique radio to a fancy case for a full-fledged Max2Play touch display bundle.
↧
The new Raspberry Pi 4B Models with Max2Play
The new Raspberry Pi 4 with 4GB RAM, USB 3.0, Bluetooth 5.0 and Gigabit Ethernet is now available in the Max2Play Shop and as part of the HiFiBerry bundles.
↧
Allo Shanti – Linear Dual Power Supply for Raspberry Pi
Max2Play now offers the new Shanti dual PSU from Allo! This linearly regulated PSU has 5.2V/3A and 5.2V/1.2A for the Raspberry Pi and BOSS or DigiOne Signature.
↧